


Deep Drip® Installation
There are two ways to install the Deep Drip tree watering stakes. Either by inserting the stakes during new planting or by driving the stake into the ground (while wearing protective eye wear, of course) around an existing tree. The reinforced pointed tip and specially designed cap are engineered to take quite a hammering.
During one test in extremely hard ground, our researchers used a 3-pound sledge hammer, pounding the stake 484 times to get a 36" unit into the ground. Obviously, this was very hard ground and most installations may only require a couple of dozen hits, although we mention this to show you the strength and durability of our Stakes.
Step 1
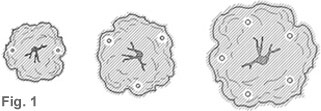
Designate a location for the Deep Drip tree root watering stake
installation. Choose a spot free from underground lines and pipes;
select the location that is just inside the outer edge of tree's canopy.
Newer trees are recommended to have 1-2 stakes on opposing sides or
around the tree base. Older, more established trees may need as many
as 2-4 stakes to fill the circle around the tree (Fig. 1).
Step 2
During New Planting of Trees: After the tree has been placed
in the hole, insert 1- 2 Deep Drip Stakes vertically in the hole
surrounding the tree before back-filling with soil. The top of Deep Drip
Stake can either be above ground level or below ground, depending on
your preference.
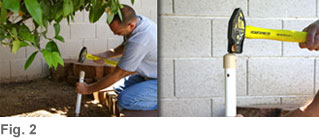
Installation at Existing Tree: If you are installing Deep Drip Stakes at an existing tree where a hole no longer exists, then you will need to either dig a hole or drive Deep Drip into the ground manually. To drive into the ground using a sledge hammer, place slotted end cap on the open end of the shaft without the drip line inserted (Fig. 2). Always wear protective eye wear. Do not directly hammer the 'uncapped' end into the ground as this could break or destroy the shaft. A three-pound sledge hammer is recommended to drive the stake into the ground.
Step 3
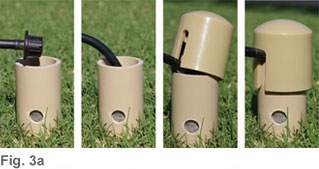
When positioned in the ground, remove cap and insert end of existing
drip line and emitter into the shaft aligning the drip line with the
slot in the cap (Fig. 3a). Re-install cap to secure drip line and stop
excess debris from entering shaft. We also recommend to place an emitter
at the surface in addition to the Deep Drip units (as seen in the
illustrations on the Home Page). This will ensure that the shallow roots
will get the much needed water as well as the deeper roots.
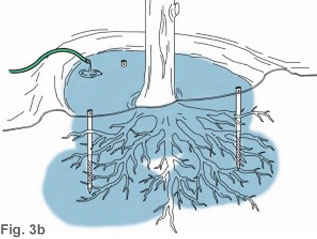
When using the Deep Drip system with a hose, we recommend that you create a small berm or wall around your tree to hold in the water and prevent run-off. Bury 1-2 Deep Drip stakes equally spaced within the berm or wall around the tree (Fig. 3b). Remove the caps from the stakes; lay the slow flowing hose within the berm or wall and allow the water to saturate the shallow roots near the surface and eventually flow down into the stakes to water the deeper roots. The harder the ground, the slower and longer the flow you will need to saturate the root zone.
Step 4
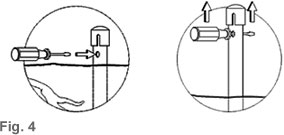
To Remove Stake: Insert rod or standard screwdriver through the
two holes in the main shaft just below the cap. Slide the rod through
the shaft and pull up (Fig.4). Slightly twisting the shaft may be
necessary for easier removal. Every six months it is recommended to
rotate the stake 360 degrees while in the ground to keep the small roots
from entering the shaft.
Step 5
Watering and Fertilization: Ask your local lawn and garden
professional for recommendations on watering levels, emitters, and
different types of tree fertilizer, specific to your tree's needs. We
recommend fertilizers that are water soluble.
Troubleshooting: If soil is too dense, water the
area around the tree and use a soil softener to soften the ground before
inserting. Also we recommend to insert stake or rod into the ground and
remove to clear pathway for new stake.
Again, make sure you are aware of any underground lines or pipes and do
not insert where they may exist.
Idea: Pour water-soluble or granulated tree fertilizer into shaft after positioning in ground. Water will pass through and slowly dissolve nutrients, feeding the tree at the roots.